Tuesday, 02 Apr, 2024 -1888

How to install WordPress

Basic Instructions:

 For those who are already familiar with carrying out these installs, below is a condensed version of the instructions.

  1. Download and unzip the WordPress package if you haven’t already.
  2. Create a database for WordPress on your web server, as well as a MySQL (or MariaDB) user who has all privileges for accessing and modifying it.
  3. (Optional) Find and rename 
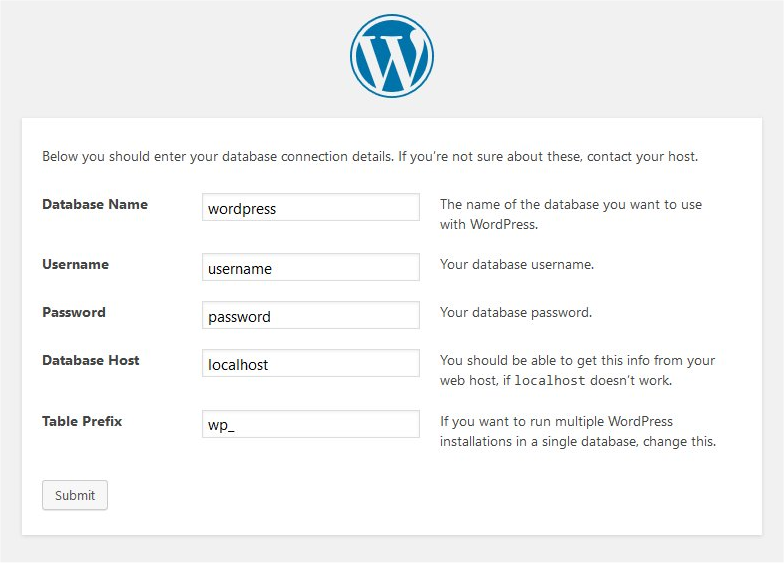
wp-config-sample.php to wp-config.php, then edit the file (see Editing wp-config.php) and add your daftabase information.
    Note: If you are not comfortable with renaming files, step 3 is optional and you can skip it as the install program will create the wp-config.php file for you.
  4. Upload the WordPress files to the desired location on your web server:
    • If you want to integrate WordPress into the root of your domain (e.g. http://example.com/), move or upload all contents of the unzipped WordPress directory (excluding the WordPress directory itself) into the root directory of your web server.A login prompt will appear if the WordPress installation was successful.
    • If you want to have your WordPress installation in its own subdirectory on your website (e.g. http://example.com/blog/), create the blog directory on your server and upload the contents of the unzipped WordPress package to the directory via FTP.
    • Note: If your FTP client has an option to convert file names to lower case, make sure it’s disabled.
  5. Run the WordPress installation script by accessing the URL in a web browser. This should be the URL where you uploaded the WordPress files.
  6. – If WordPress was installed in the root directory, go to http://example.com/.
    – For instance, If WordPress was installed in the root directory, go to http://example.com/.
    That’s it! WordPress should now be installed.


    Step 1: Download and Extract

    Download and unzip the WordPress package from wordpress.org/download/.

    • If you will be uploading WordPress to a remote web server, download the WordPress package to your computer with a web browser and unzip the package.
    • If you will be using FTP, skip to the next step – uploading files is covered later.
    • If you have shell access to your web server, and are comfortable using console-based tools, you may wish to download WordPress directly to your web server using wget (or lynx or another console-based web browser) if you want to avoid FTPing:
      • wget https://wordpress.org/latest.tar.gz
      • Then extract the package using:
      • tar -xzvf latest.tar.gz

      In the same directory where you downloaded latest.tar.gz, the WordPress package will unzip into a folder named wordpress.


      Step 2: Download and Extract

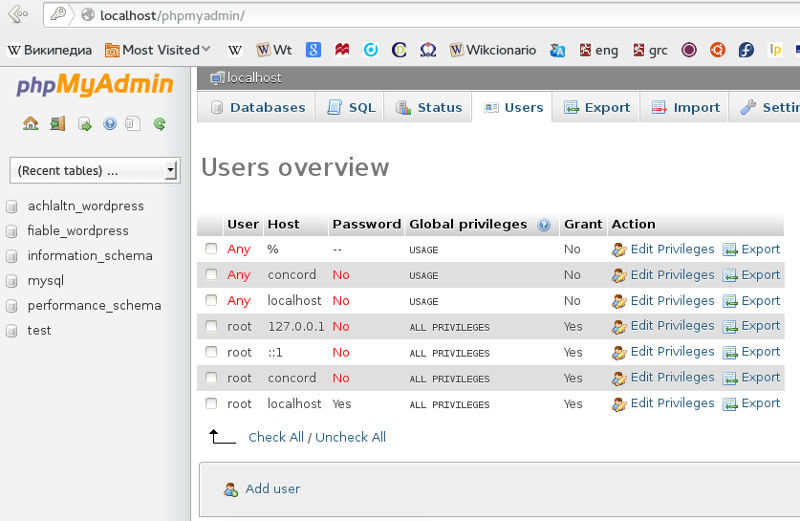
      If you are utilizing a hosting company, there's a chance that they've already set up a WordPress database for you, or there might be an automated setup option available. For information on whether or whether you'll need to build one manually, look through the help pages offered by your hosting company or your control panel. If it turns out that you'll have to create one by hand, create your WordPress login and database by following the steps listed below for Using phpMyAdmin. For more tools like Plesk, cPanel, and Using the MySQL Client, see the WordPress Database Creation article.

      If you have only one database and it is already in use, you can install WordPress in it – just make sure to have a distinctive prefix for your tables tables.

      Using phpMyAdmin

      You may create your WordPress login and database by following these instructions if phpMyAdmin is installed on your web server. When using a personal computer, PhpMyAdmin can be installed automatically on the majority of Linux distributions.

      Note: These instructions are written for phpMyAdmin 4.4; the phpMyAdmin user interface can vary slightly between versions.

      1. If a database relating to WordPress does not already exist in the Database dropdown on the left, create one:
        1. Choose a name for your WordPress database: ‘wordpress‘ or ‘blog‘ are good, but most hosting services (especially shared hosting) will require a name beginning with your username and an underscore, so, even if you work on your own computer, we advise that you check your hosting service requirements so that you can follow them on your own server and be able to transfer your database without modification. Enter the chosen database name in the Create database field and choose the best collation for your language and encoding. In most cases it’s better to choose in the “utf8_” series and, if you don’t find your language, to choose “utf8mb4_general_ci” (Refer this article about upgrading to utf8mb4).
          Creating a database in phpMyAdmin 4.4
        2. Click the phpMyAdmin icon in the upper left to return to the main page, then click the Users tab. If a user relating to WordPress does not already exist in the list of users, create one:
          Create user in phpMyAdmin 4.4

          1. Click Add user.
          2. Choose a username for WordPress (‘wordpress‘ is good) and enter it in the User name field. (Be sure Use text field: is selected from the dropdown.)
          3. Choose a secure password (ideally containing a combination of upper- and lower-case letters, numbers, and symbols), and enter it in the Password field. (Be sure Use text field: is selected from the dropdown.) Re-enter the password in the Re-type field.
          4. Write down the username and password you chose.
          5. Leave all options under Global privileges at their defaults.
          6. Click Go.
          7. Return to the Users screen and click the Edit privileges icon on the user you’ve just created for WordPress.
          8. In the Database-specific privileges section, select the database you’ve just created for WordPress under the Add privileges to the following database dropdown, and click Go.
          9. The page will refresh with privileges for that database. Click Check All to select all privileges, and click Go.
          10. On the resulting page, make note of the host name listed after Server: at the top of the page. (This will usually be localhost.)

        Make sure the server is localhost

        Step 3: Set up wp-config.php

        You have two options: either make the necessary changes to the wp-config.php file or forego this step and let WordPress to attempt to accomplish this on its own when the installation script is executed.(WordPress still needs to know your database details). (For additional information, see Editing wp-config.php. It provides step-by-step instructions for generating the configuration file and your secret key for password security) .

        Return to where you extracted the WordPress package in Step 1, rename the file wp-config-sample.php to wp-config.php, and open it in a text editor.

        Enter your database information under the section labeled

         // ** MySQL settings - You can get this info from your web host ** //
        

        DB_NAME
        The database name that you generated in Step 2 for WordPress. 
        DB_USER
        The WordPress username that you generated in Step 2.
        DB_PASSWORD
        The password that you selected in Step 2 for your WordPress username.
        DB_HOST
        The hostname that you choose in Step 2 (which is typically localhost, though there are several acceptable values for DB_HOST). Add a colon (:) and the necessary data to the hostname if a port, socket, or pipe is required.
        DB_CHARSET
        Generally speaking, the database character set shouldn't be altered (see Editing wp-config.php)..
        DB_COLLATE
        Generally speaking, the database collation should be left empty (see Editing wp-config.php).

        Enter your secret key values under the section labeled

        /* Authentication Unique Keys and Salts. */
        

        Save the wp-config.php file.


        Step 4: Upload the files

        You now need to select the domain location where you want your WordPress-powered website to appear:
        – In the root directory of your website. (For example, http://example.com/)
        – Within a website subfolder. (For instance, http://blog.example.com/)

        Note: Different hosting companies and operating systems will have different locations for your root web directory within the filesystem on your web server. If you are unsure of where this is, ask the system administrator or your hosting company.


        In the Root Directory

        • If you need to upload your files to your web server, use an FTP client to upload all the contents of the wordpress directory (but not the directory itself) into the root directory of your website.
          If your files are already on your web server, and you are using shell access to install WordPress, move all of the contents of the wordpress directory (but not the directory itself) into the root directory of your website.


        In a Subdirectory

        • If you need to upload your files to your web server, rename the wordpress directory to your desired name, then use an FTP client to upload the directory to your desired location within the root directory of your website.
        • If your files are already on your web server, and you are using shell access to install WordPress, move the wordpress directory to your desired location within the root directory of your website, and rename the directory to your desired name.


        Step 5: Run the Install Script

        Navigate to the installation script via a web browser.

        • If you placed the WordPress files in the root directory, you should visit: http://example.com/wp-admin/install.php
        • If you placed the WordPress files in a subdirectory called blog, for example, you should visit: http://example.com/blog/wp-admin/install.php


        Setup configuration file

        WordPress will inform you and provide you the option to attempt creating and editing the wp-config.php file if it cannot locate it. (Alternatively, you can load wp-admin/setup-config.php directly in your browser to accomplish this.) The database information will be requested by WordPress and written to a new wp-config.php file. You can proceed with the installation if this works; if not, return to step 3 and create, change, and upload the wp-config.php file yourself..

        The WordPress setup screen

        Top ↑

        Finishing installation

        The installation process is depicted in the following screenshots. You provide your site title, preferred user name, two password choices, and email address when you access the details screen. Also displayed is a check-box asking if you would like your blog to appear in search engines like Google and DuckDuckGo. If you want search engines to be unable to view your blog, leave the box unchecked. If you wish to ban search engines, tick the box. but allow normal visitors. Take note that you can modify all of this data on your administration screen at a later time.

        The WordPress installation screen

        A login prompt will appear if the WordPress installation was successful.

        Install script troubleshooting
        – Should the install script encounter a database problem,
        Return to Steps 2 and 3 to confirm that all required database information has been added to wp-config.php.
        – Verify in Step 3 that you allowed the WordPress user to access the WordPress database.
        – Verify that in Step 3, you allowed your WordPress user to access your WordPress database.


Tags:
Tags
Most Popular
img
How to install WordPress
02 Apr, 2024 view: 1888
img
Xampp Tutorial Create Your Own Local Test Server
02 Apr, 2024 view: 770
img
How to Install Laravel
02 Apr, 2024 view: 759
img
PHP is not recognized as an internal or external command
02 Apr, 2024 view: 558
img
How to Install Composer on Windows
01 Apr, 2024 view: 543
img
Summernote image upload
01 Nov, 2023 view: 495
img
How to clear select2 selected value in js
01 Nov, 2023 view: 377
img
Zipping and Unzipping Files in Linux
02 Apr, 2024 view: 342
img
How to add Datepicker in Bootstrap
26 Apr, 2024 view: 336
img
How to Import a MySQL Database using Command Line
02 Apr, 2024 view: 327
img
How to Installation Laragon
01 Apr, 2024 view: 179
img
How to Installing an SSL certificate on your server using cPanel
06 Apr, 2024 view: 146
img
Paypal Payment Gateway Integration With Laravel
06 Apr, 2024 view: 119
img
How to Use Laravel Middleware to Protect Your Application
09 Apr, 2024 view: 105
img
Laravel Cache Clear Command Php Artisan Optimize
09 Apr, 2024 view: 105
img
Laravel Authentication Tutorial
09 Apr, 2024 view: 103
img
why important website development learn
10 Apr, 2024 view: 103
img
How to Integrate Stripe Payment in Laravel
06 Apr, 2024 view: 101
img
laravel qr code generator package
18 Apr, 2024 view: 93
  • asdfasdf
    asdfasdf
    New comment
    2020-08-20 22:08:18 Reply
    • asdfasdf
      asdfasdf
      sadfasdf
      2020-08-20 22:14:39
    • asdfasdf
      asdfasdf
      asdfasf
      2020-08-20 22:14:32
    • asdfasdf
      asdfasdf
      sdfasdf
      2020-08-20 22:14:29
    • asdfasdf
      asdfasdf
      ffff
      2020-08-20 22:14:24
    • asdfasdf
      asdfasdf
      ccc
      2020-08-20 22:08:33
    • asdfasdf
      asdfasdf
      bbb
      2020-08-20 22:08:28
    • asdfasdf
      asdfasdf
      aaa
      2020-08-20 22:08:23
  • asdfasdf
    asdfasdf
    sdfasdf
    2020-08-20 22:14:43 Reply
    • asdfasdf
      asdfasdf
      sdfasdf
      2020-08-20 22:14:52
    • asdfasdf
      asdfasdf
      asdfasdf
      2020-08-20 22:14:49
  • Teegan Henderson
    Teegan Henderson
    Ullam perferendis in
    2023-10-17 05:49:30 Reply